RHEL6 搭建 keepalived + lvs/DR 集群
使用Keepalived为LVS调度器提供高可用功能,防止调度器单点故障,为用户提供Web服务:
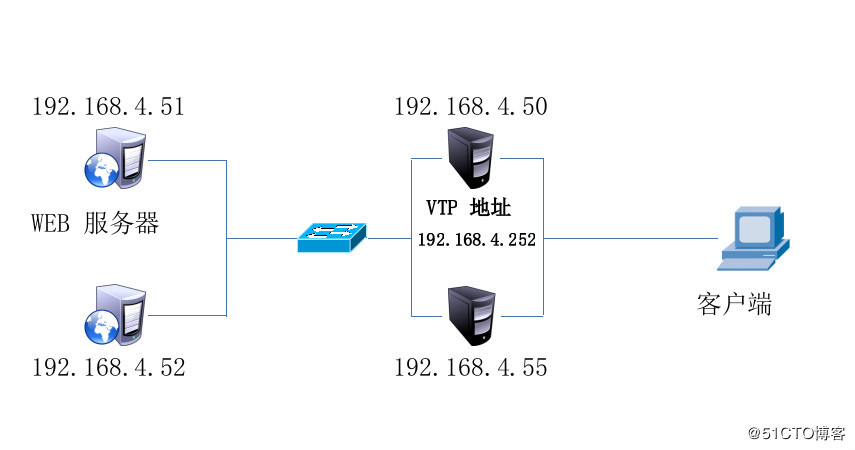
- LVS1调度器真实IP地址为192.168.4.50
- LVS2调度器真实IP地址为192.168.4.55
- 服务器VIP地址设置为192.168.4.252
- 真实Web服务器地址分别为192.168.4.51、192.168.4.52
实验拓扑图:
实验步骤:
实验准备:
配置yum源
# service iptables stop            //关闭防火墙
# chkconfig iptables off            //关闭开机自启
# setenforce 0                            //设置SELinux 为宽松模式
配置WEB服务器 pc51 / pc52
#yum -y install httpd
#service httpd start
#chkconfig httpd on
[root@pc51 ~] #echo " 192.168.4.51  " > /var/www/html/test.html
[root@pc52 ~] #echo " 192.168.4.52 " > /var/www/html/test.html
本次实验有些步骤就不详细介绍了,具体有关 keepalived 和 ipvsadm 的相关配置 可以参考
keepalived 配置高可用集群 : http://blog.51cto.com/13558754/2060950
ipvsadm 配置LVS/DR 负载均衡集群:http://blog.51cto.com/13558754/2060405
1、在web服务上 配置 VIP地址 pc51 / pc52
# ifconfig lo:1 192.168.4.252/32    //只拥有ip 就可以
# ifconfig lo:1
lo:1      Link encap:Local Loopback
         inet addr:192.168.4.252  Mask:0.0.0.0
         UP LOOPBACK RUNNING  MTU:65536  Metric:1
# cd /proc/sys/net/ipv4/conf/
# echo 1 > lo/arp_ignore
# echo 2 > lo/arp_announce
# echo 1 > all/arp_ignore
# echo 2 > all/arp_announce
2、配置分发器 50(主) 55(备) 分别安装keepalived软件 装包 ipvsadm
# rpm -q ipvsadm keepalived
ipvsadm-1.26-4.el6.x86_64
keepalived-1.2.13-5.el6_6.x86_64
3、修改配置文件
[root@pc50 ~]# vim /etc/keepalived/keepalived.conf
 vrrp_instance VI_1 {
      state MASTER                 // 描述信息  MASTER为主服务器
      interface eth0                 // 定义网络接口
      virtual_router_id 51           //主 备VRID号必须一致
      priority 150                   //服务器优先级
      advert_int 1
      authentication {
          auth_type PASS           //验证方式
          auth_pass 1111           //验证密码     主  备服务器密码必须一致
      }
      virtual_ipaddress {
          192.168.4.252            //VIP地址
      }
  }

  virtual_server 192.168.4.252 80 {        //配置 VIP为192.168.0.252  80 端口
      delay_loop 6
      lb_algo rr                            //设置LVS调度算法为RR
      lb_kind DR                            //设置LVS的模式为DR
      nat_mask 255.255.255.0
      persistence_timeout 50
      protocol TCP
      connect_timeout 3
      nb_get_retry 3
      delay_before_retry 3

     real_server 192.168.4.51 80 {
          weight 1                        //设置权重为1
     }
     real_server 192.168.4.52 80 {
          weight 1                        //设置权重为1
      }

  }
使用第一个虚拟服务的模版
其余的都删除
主机55
[root@pc55 ~]# vim /etc/keepalived/keepalived.conf
  vrrp_instance VI_1 {
      state BACKUP                // 描述信息 BACKUP为备用服务器
      interface eth0
      virtual_router_id 51
      priority 100
      advert_int 1
      authentication {
          auth_type PASS
          auth_pass 1111
      }
      virtual_ipaddress {
          192.168.4.252
      }
  }

  virtual_server 192.168.4.252 80 {
      delay_loop 6
      lb_algo rr
      lb_kind DR
      nat_mask 255.255.255.0
      persistence_timeout 50
      protocol TCP
      connect_timeout 3
      nb_get_retry 3
      delay_before_retry 3

      real_server 192.168.4.51 80 {
          weight 1
      }
      real_server 192.168.4.52 80 {
          weight 1
      }
  }
4、启动服务
    # service keepalived start
    [root@pc50 ~]# ipvsadm -Ln
    IP Virtual Server version 1.2.1 (size=4096)
    Prot LocalAddress:Port Scheduler Flags
      -> RemoteAddress:Port           Forward Weight ActiveConn InActConn
    TCP  192.168.4.252:80 rr persistent 50
      -> 192.168.4.51:80              Route   1      0          0
      -> 192.168.4.52:80              Route   1      0          0
    [root@pc50 ~]# ip addr show | grep 192.168.4
        inet 192.168.4.50/24 brd 192.168.4.255 scope global eth0
        inet 192.168.4.252/32 scope global eth0

    [root@pc55 ~]# ipvsadm -Ln --stats
    IP Virtual Server version 1.2.1 (size=4096)
    Prot LocalAddress:Port               Conns   InPkts  OutPkts  InBytes OutBytes
      -> RemoteAddress:Port
    TCP  192.168.4.252:80               0        0        0        0        0
      -> 192.168.4.51:80                     0        0        0        0        0
      -> 192.168.4.52:80                     0        0        0        0        0
    [root@pc55 ~]# ip addr show | grep 192.168.4
        inet 192.168.4.55/24 brd 192.168.4.255 scope global eth0
5、客户端访问
# elinks --dump 192.168.4.252
   192.168.4.52
[root@room1pc32 桌面]# elinks --dump 192.168.4.252
   192.168.4.51
[root@room1pc32 桌面]# elinks --dump 192.168.4.252
   192.168.4.52
[root@room1pc32 桌面]# elinks --dump 192.168.4.252
   192.168.4.51
[root@room1pc32 桌面]# elinks --dump 192.168.4.252
   192.168.4.52

# ipvsadm -Ln --stats
IP Virtual Server version 1.2.1 (size=4096)
Prot LocalAddress:Port               Conns   InPkts  OutPkts  InBytes OutBytes
  -> RemoteAddress:Port
TCP  192.168.4.252:80               5       25        0     2075        0
  -> 192.168.4.51:80                     2       10        0      830        0
  -> 192.168.4.52:80                     3       15        0     1245        0

[root@pc55 ~]# ipvsadm -Ln --stats
IP Virtual Server version 1.2.1 (size=4096)
Prot LocalAddress:Port               Conns   InPkts  OutPkts  InBytes OutBytes
  -> RemoteAddress:Port
TCP  192.168.4.252:80               0        0        0        0        0
  -> 192.168.4.51:80                     0        0        0        0        0
  -> 192.168.4.52:80                     0        0        0        0        0
模拟50 故障 验证Keepalived 高可用
[root@pc50 ~]#  service keepalived stop

[root@pc50 ~]# ip addr show | grep 192.168.4
    inet 192.168.4.50/24 brd 192.168.4.255 scope global eth0

[root@pc55 ~]# ip addr show | grep 192.168.4
    inet 192.168.4.55/24 brd 192.168.4.255 scope global eth0
    inet 192.168.4.252/32 scope global eth0
客户端访问
# elinks --dump 192.168.4.252
   192.168.4.52
# elinks --dump 192.168.4.252
   192.168.4.51
# elinks --dump 192.168.4.252
   192.168.4.52
# elinks --dump 192.168.4.252
   192.168.4.51
# elinks --dump 192.168.4.252
   192.168.4.52

# ipvsadm -Ln --stats
IP Virtual Server version 1.2.1 (size=4096)
Prot LocalAddress:Port               Conns   InPkts  OutPkts  InBytes OutBytes
  -> RemoteAddress:Port
TCP  192.168.4.252:80               5       25        0     2075        0
  -> 192.168.4.51:80                     2       10        0      830        0
  -> 192.168.4.52:80                     3       15        0     1245        0
标签云
-
WgetVPSNginxWordPressOfficeCrontabAppleInnoDBMemcacheKubernetesTomcatRedisPHPDNSLighttpdKVMPutty监控ApacheRedhatiPhoneSVNCentosGITWiresharkOpenStackMacOSKotlinCDN集群squidDebianWPSAnsibleVsftpd代理服务器WindowsSnmpSambaMySQLSecureCRTKloxoSaltStackUbuntuOpenVZIptablesLinuxYumCurl备份FirewalldRsyncIOSJenkinsPostfixSocketVagrantTensorFlowVirtualminFlaskSSHSystemdMongodbDeepinAndroidSwiftZabbixSwarmShellLVMMariaDB缓存BashSQLAlchemyPostgreSQLCactiGooglePythonSupervisorFlutterGolangDockerVirtualbox容器NFSLUAHAproxyTcpdump部署Openresty