基于CentOS 7实现的NFS
NFS
NFS(Network FileSystem,网络文件系统),最早由Sun公司所发展出来的,主要是通过网络让不同的主机、不同的操作系统,可以彼此分享个别档案,因此我们也可以简单把NFS看成是一个文件服务器。通过NFS我们的PC可以将网络端的NFS服务器分享的目录挂载到本地端的机器当中,在本地端的机器看起来,远程主机的目录就好像是自己的一个磁盘分区一样。
NFS服务器与客户端通过随机选择小于1024以下的端口来进行数据传输,而这个端口的确定需要借助RPC(Remote Procedure Call,远程过程调用)协议的协助。RPC最主要的功能就是在指定每个NFS服务所对应的port number,并且回报给客户端,让客户端可以连结到正确的端口上去。当我们启动NFS服务时会随机取用数个端口,并主动向RPC注册,因此RPC可以知道每个端口对应的NFS,而RPC又是固定使用 port 111监听客户端的需求并回报客户端正确的端口。
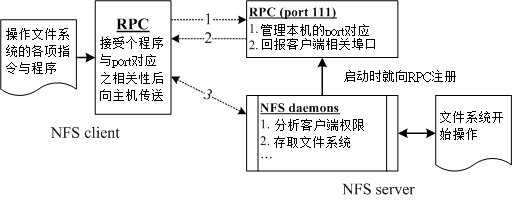
- 客户端向服务器端的RPC(port 111)发出NFS的请求;
- 服务器端找到对应的已注册的NFS daemon端口后,回报给客户端;
- 客户端知道正确的端口后,直接与NFS daemon联机。
实现NFS
实验环境
[root@nfs ~]# lsb_release -r
Release:    7.2.1511
[root@nfs ~]# yum -y install nfs-utils
[root@nfs ~]# rpm -qi nfs-utils
Name        : nfs-utils
Epoch      : 1
Version    : 1.3.0
Release    : 0.54.el7
Architecture: x86_64
[root@nfs ~]# systemctl stop firewalld
[root@nfs ~]# setenforce 0
[root@nfs ~]# mkdir /nfs_dir
[root@nfs ~]# vim /nfs_dir/welcome
  This is NFS test file.
NFS相关配置
相关配置文件:
配置文件:/etc/exports
配置文件目录:/etc/exports.d
NFS服务的主配置文件为/etc/exports,用于定义共享的目录以及客户端的权限,格式如下:
/PATH/TO/SOME_DIR clients1(export_options,...) clients2(export_options,...)
其中clients支持以下几种格式:
- single host:ipv4,ipv6,FQDN
- network:address/netmask
- wildcards:主机名通配,例如,*.magedu.com
- netgroups:NIS域内的主机组,@group_name
- anonymous:使用*通配所有主机
export_options的常见参数可以分为以下两类:
- General Options:
- ro:客户端挂载后,其权限为只读,默认选项;
- rw:读写权限;
- sync:同时将数据写入到内存与硬盘中;
- async:异步,优先将数据保存到内存,然后再写入硬盘;
- Secure:要求请求源的端口小于1024
- User ID Mapping:
- root_squash:当NFS客户端使用root用户访问时,映射到NFS服务器的匿名用户;
- no_root_squash:当NFS客户端使用root用户访问时,映射到NFS服务器的root用户;
- all_squash:全部用户都映射为服务器端的匿名用户;
- anonuid=UID:将客户端登录用户映射为此处指定的用户uid;
- anongid=GID:将客户端登录用户映射为此处指定的用户gid
更多参数信息可以通过命令 man exports 查看帮助手册
配置NFS
[root@nfs ~]# vim /etc/exports
/nfs_dir 192.168.4.*(rw,sync,root_squash)
[root@nfs ~]# systemctl start nfs-server
客户端测试
#查看nfs能挂载的选项
[root@client ~]# showmount -e 192.168.4.119
Export list for 192.168.4.119:
/nfs_dir 192.168.4.*
[root@client ~]# mount -t nfs 192.168.4.119:/nfs_dir /mnt
[root@client ~]# cd /mnt/
[root@client mnt]# ls
welcome
[root@client mnt]# cat welcome
This is NFS test file.
[root@client mnt]# touch file
touch: cannot touch ‘file’: Permission denied
可以看到无法在共享目录下创建文件,明明已经给分配了rw权限,这是因为root_squash把我们的访问权限压缩为nobody权限,自然无法对该目录进行写入操作。
对NFS的配置文件重新进行修改:
[root@nfs ~]# vim /etc/exports
/nfs_dir 192.168.4.*(rw,sync,no_root_squash)
#使用exportfs重读NFS配置,不需要重启服务
[root@nfs ~]# exportfs -rv
exporting 192.168.4.*:/nfs_dir
客户端重新测试:
[root@client mnt]# touch file
[root@client mnt]# ll
total 4
-rw-r--r--. 1 root root  0 Jun 28 14:11 file  #可以看到属主属组为root
-rw-r--r--. 1 root root 23 Jun 28 11:08 welcome
[root@client mnt]# echo 123 > file
[root@client mnt]# rm file
rm: remove regular empty file ‘file’? y  #可以删除文件
[root@client mnt]# ll
total 4
-rw-r--r--. 1 root root 23 Jun 28 11:08 welcome
很明显,将客户端访问共享文件用户映射为NFS服务器上的root是一种不安全的做法,我们可以指定客户端映射到NFS服务器的用户,配置如下:
[root@nfs ~]# useradd nfSUSEr -s /sbin/nologin
[root@nfs ~]# id nfsuser
uid=1003(nfsuser) gid=1003(nfsuser) groups=1003(nfsuser)
[root@nfs ~]# chown -R nfsuser:nfsuser /nfs_dir/
[root@nfs ~]# vim /etc/exports
[root@nfs ~]# cat /etc/exports
/nfs_dir 192.168.4.*(rw,sync,all_squash,anonuid=1003,anongid=1003)
[root@nfs ~]# exportfs -rv
exporting 192.168.4.*:/nfs_dir
客户端进行测试:
[root@client mnt]# touch file
[root@client mnt]# ll
total 4
-rw-r--r--. 1 1003 1003  0 Jun 28 14:27 file
-rw-r--r--. 1 1003 1003 23 Jun 28 11:08 welcome
[root@client mnt]# echo 123 > file
[root@client mnt]# cat welcome
This is NFS test file.
[root@client mnt]# rm file
rm: remove regular file ‘file’? y
[root@client mnt]# ll
total 4
-rw-r--r--. 1 1003 1003 23 Jun 28 11:08 welcome
标签云
-
IptablesWPSCentosPostfixOpenStackVPSOpenrestyCurlBashPythonPuttyMacOSMongodbTensorFlowWordPressGolangDebianAppleVirtualminKotlinWget集群NFS代理服务器WiresharkInnoDBSocketKloxoSambaMySQLRedisLinuxZabbixCDNCactiSwiftYumRedhatAnsibleSnmpOfficeSVNLUAWindowsNginx监控SystemdUbuntuLVMApacheKubernetesGITFlaskVirtualboxAndroidDocker容器DeepinFirewalldRsyncsquidTcpdumpSecureCRTHAproxySupervisoriPhoneKVM备份CrontabDNSPostgreSQL部署GoogleMemcacheTomcatVagrantOpenVZLighttpdSSHPHPMariaDBFlutter缓存JenkinsIOSVsftpdShellSwarmSQLAlchemySaltStack