Ubuntu 16.04安装Magento 2 Varnish和Apache
Magento是一个免费的开源内容管理系统,内置PHP,Zend框架和MySQL数据库。 它是非常受欢迎的电子商务网络应用程序,运行在诸如Apache,MySQL等许多开源应用程序之上。 Magento配有大量内置模块,用于添加更多功能。
Varnish Cache是一个功能强大的开源Web应用程序加速器,也称为缓存HTTP反向代理。 它用于通过在用户第一次访问时缓存网页的副本来加快您的网站。 Magento和Varnish是一种已知的组合,可以显着提高现场性能。 默认情况下,Magento 2集成了Varnish。您只需要进行一些配置更改,使其正常工作。
在本教程中,我们将学习如何在Ubuntu 16.04服务器上将Magento 2与Varnish安装为全页缓存。
要求
- 运行Ubuntu 16.04的服务器。
- Apache,PHP和MariaDB。
- 在您的服务器上设置sudo权限的非root用户。
1. 入门指南
在启动之前,建议使用最新的软件包通过运行以下命令来更新系统:
sudo apt-get update -y
sudo apt-get upgrade -y
一旦您的系统是最新的,请重新启动系统并使用sudo用户登录。
2. 安装LAMP服务器
Magento将无法安装LAMP(Apache,PHP,MariaDB)。 首先,通过运行以下命令安装Apache Web服务器和Varnish:
sudo apt-get install apache2 varnish -y
安装Apache后,启动Apache服务,并通过运行以下命令使其启动:
sudo systemctl start apache2
sudo systemctl enable apache2
Magento是用PHP语言编写的,所以您还需要将PHP与所有库一起安装到系统中。 您可以通过运行以下命令来安装它们:
sudo apt-get install php7.0 libapache2-mod-php7.0 php7.0-mbstring php7.0-mysql php7.0-mcrypt php7.0-xsl php-imagick php7.0-gd php7.0-cli php-pear php7.0-intl php7.0-curl php7.0-zip php7.0-gd php7.0-soap php7.0-xml -y
安装PHP以及所有必需的库后,您将需要更改几个默认的PHP设置。 您可以通过编辑php.ini文件来执行此操作:
sudo nano /etc/php/7.0/cli/php.ini
更改以下行:
memory_limit = 512
upload_max_filesize = 128M
zlib.output_compression = on
max_execution_time = 15000
完成后保存并关闭文件。
3. 安装并配置MariaDB
Magento使用MariaDB作为数据库。 所以你需要将它安装到你的服务器上。 您可以通过运行以下命令来安装它:
sudo apt-get install mariadb-server -y
安装MariaDB后,启动MariaDB服务,并通过运行以下命令使其在启动时启动:
sudo systemctl start mysql
sudo systemctl enable mysql
默认情况下,MariaDB不受保护,因此您需要确保它。 您可以通过运行以下命令来保护它:
sudo mysql_secure_installation
回答以下所有问题:
NOTE: RUNNING ALL PARTS OF THIS SCRIPT IS RECOMMENDED FOR ALL MariaDB
      SERVERS IN PRODUCTION USE!  PLEASE READ EACH STEP CAREFULLY!

In order to log into MariaDB to secure it, we'll need the current
password for the root user.  If you've just installed MariaDB, and
you haven't set the root password yet, the password will be blank,
so you should just press enter here.

Enter current password for root (enter for none):
OK, successfully used password, moving on...

Setting the root password ensures that nobody can log into the MariaDB
root user without the proper authorisation.

You already have a root password set, so you can safely answer 'n'.

Change the root password? [Y/n] n

 ... skipping.

By default, a MariaDB installation has an anonymous user, allowing anyone
to log into MariaDB without having to have a user account created for
them.  This is intended only for testing, and to make the installation
go a bit smoother.  You should remove them before moving into a
production environment.

Remove anonymous users? [Y/n] Y
 ... Success!

Normally, root should only be allowed to connect from 'localhost'.  This
ensures that someone cannot guess at the root password from the network.

Disallow root login remotely? [Y/n] Y
 ... Success!

By default, MariaDB comes with a database named 'test' that anyone can
access.  This is also intended only for testing, and should be removed
before moving into a production environment.

Remove test database and access to it? [Y/n] Y
 - Dropping test database...
 ... Success!
 - Removing privileges on test database...
 ... Success!

Reloading the privilege tables will ensure that all changes made so far
will take effect immediately.

Reload privilege tables now? [Y/n] Y
 ... Success!

Cleaning up...

All done!  If you've completed all of the above steps, your MariaDB
installation should now be secure.

Thanks for using MariaDB!
接下来,使用以下命令登录到MariaDB shell:
mysql -u root -p
在提示时输入root密码,然后使用以下命令为Magento创建一个数据库:
MariaDB [(none)]>CREATE DATABASE magento_db;
为Magento创建数据库后,使用以下命令创建用户名和密码:
MariaDB [(none)]>CREATE USER ‘magento’@’localhost’ IDENTIFIED BY ‘password’;
接下来,使用以下命令将权限授予Magento数据库:
MariaDB [(none)]>GRANT ALL PRIVILEGES ON magento_db.* TO ‘magento’@’localhost’;
接下来,运行FLUSH PRIVILEGES命令,以退出特权:
MariaDB [(none)]>FLUSH PRIVILEGES;
最后,使用以下命令退出MariaDB控制台:
MariaDB [(none)]>\q
4. 下载Magento
首先,您需要从官方网站下载最新版本的Magento。
下载Magento后,使用以下命令将下载的zip文件解压缩到apache web根目录:
sudo mkdir /var/www/html/magento/
sudo unzip magento2-develop.zip -d /var/www/html/magento
接下来,更改magento目录的所有权,并给予适当的许可:
sudo chown -R www-data:www-data /var/www/html/magento
sudo chmod -R 777 /var/www/html/magento
接下来,您需要将Composer安装到系统中。 Composer是一个依赖管理器,用于安装所有必需的PHP依赖关系。 您可以使用以下命令下载并安装Composer二进制文件:
curl -sS https://getcomposer.org/installer | php
sudo mv composer.phar /usr/bin/composer
接下来,运行composer命令来安装Magento所需的所有依赖项:
cd /var/www/html/magento
sudo composer install
一旦安装了所有依赖项,您可以继续为Magento配置Apache。
5. 为Magento配置Apache
接下来,您需要为Magento创建Apache虚拟主机文件。 使用以下命令创建一个名为magento.conf的新Apache配置文件:
sudo nano /etc/apache2/sites-available/magento.conf
添加以下行:
<VirtualHost *:8080>
ServerAdmin admin@example.com
DocumentRoot /var/www/html/magento
ServerName 192.168.15.189
ServerAlias www.example.com
<<Directory "/var/www/html/magento/">
Options FollowSymLinks
AllowOverride All
Order allow,deny
allow from all
</Directory>
ErrorLog /var/log/apache2/magento-error_log
CustomLog /var/log/apache2/magento-access_log common
</VirtualHost>
保存文件,然后使用Apache重写模块启用虚拟主机以下命令:
sudo a2ensite magento
sudo a2enmod rewrite
接下来,您还需要将Apache监听端口从80更改为8080.因为我们将为Varnish预留端口80。 要这样做,打开ports.conf文件:
sudo nano /etc/apache2/ports.conf
更改文件如下所示:
Listen 8080
最后,重新启动Apache服务以使用以下命令应用此更改:
sudo systemctl restart apache2
6. 访问Magento Web安装向导
Magento现已安装,现在是通过网络浏览器安装Magento的时候了。
要这样做,打开你的网页浏览器并输入URL http://192.168.15.189:8080 ,你应该看到以下页面:
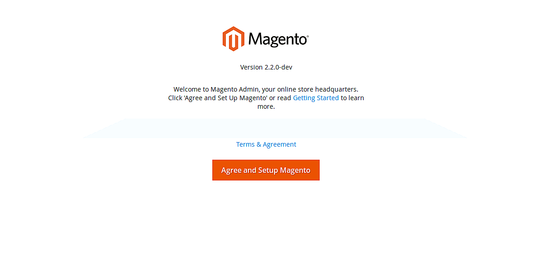
现在,同意条款和条件,然后点击“同意和设置Magento”按钮,您应该看到以下页面:

检查所有准备状态,然后单击“下一步”按钮,您应该看到以下页面:
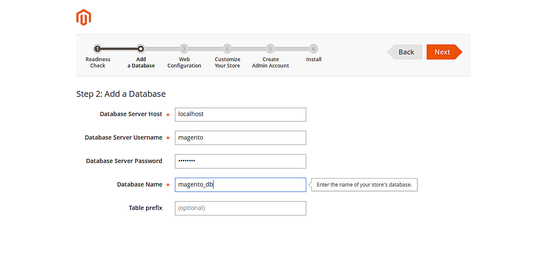
提供您的数据库详细信息,如数据库名称,数据库用户名和密码,然后单击“下一步”按钮,您应该看到以下页面:
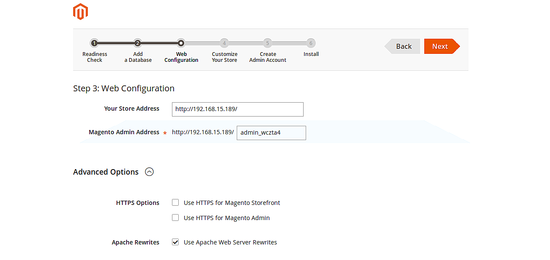
提供您的网站详细信息,并点击“下一步”按钮,您应该看到以下页面:
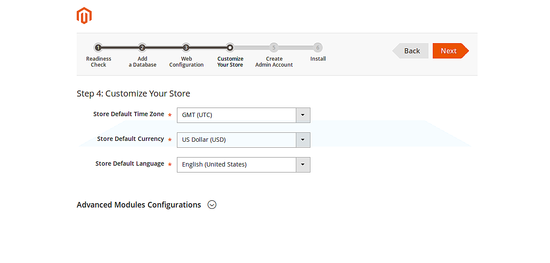
根据您的需要定制Magento,然后点击“下一步”按钮,您将看到以下页面:

提供您的管理员用户详细信息,然后单击“下一步”按钮,您应该看到以下页面:
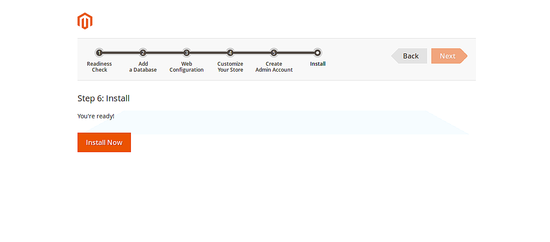
现在,点击“立即安装”按钮开始安装Magento。 安装完成后,您将看到以下页面:
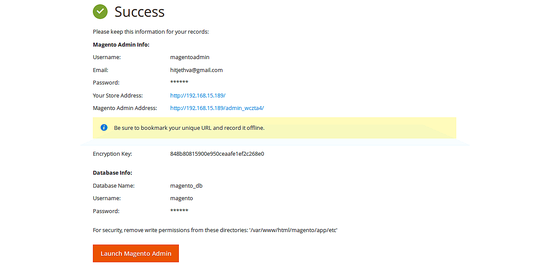
注意:记住您的Magento管理员URL: http : //192.168.15.189/admin_wczta4 。 这将用于访问Magento管理员。
现在,点击“启动Magento管理”按钮,你应该看到Magento登录页面如下:
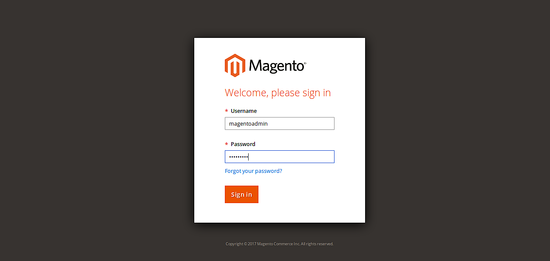
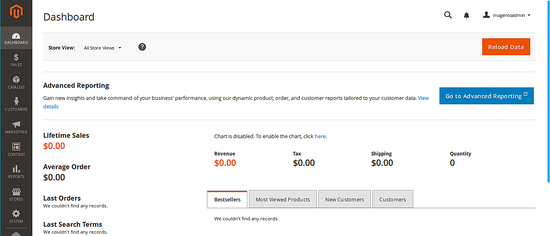
提供您的Magento管理员凭据并点击“登录”按钮,您应该看到Magent-o仪表板如下所示:
从您的Magento管理仪表板单击STORES按钮(左侧)>配置> ADVANCED>系统>全页缓存 ,然后取消选择使用系统值,并从缓存应用程序列表中选择Varnish缓存,保存配置,单击Varnish配置链接和单击导出VCL for Varnish 4按钮(这将导出var / www / html / magento / var directoy中的varnish.vcl文件),如下所示:

最后,使用以下命令刷新Magento缓存:
cd /var/www/html/magento
sudo php bin/magento cache:flush
一旦你完成,你可以继续配置Varnish。
7. 配置Varnish
Magento现已安装并配置。 现在是配置Varnish的时候了。
首先,删除/etc/varnish/default.vcl文件并从导出的Varnish配置创建一个符号链接:
sudo rm -rf /etc/varnish/default.vcl
sudo ln -s /var/www/html/magento/var/varnish.vcl /etc/varnish/default.vcl
接下来,您将需要为Varnish创建一个systemd服务文件。 您可以将varnish.service从/ lib / systemd / system /复制到/ etc / systemd / system /目录中:
sudo cp /lib/systemd/system/varnish.service /etc/systemd/system/
复制该文件后,您将需要对varnish.service文件进行一些更改:
sudo nano /etc/systemd/system/varnish.service
进行以下更改:
[Unit]
Description=Varnish HTTP accelerator
Documentation=https://www.varnish-cache.org/docs/4.1/ man:varnishd

[Service]
Type=simple
LimitNOFILE=131072
LimitMEMLOCK=82000
ExecStart=/usr/sbin/varnishd -j unix,user=vcache -F -a :80 -T localhost:6082 -f /etc/varnish/default.vcl -S /etc/varnish/secret -s malloc,256m
ExecReload=/usr/share/varnish/reload-vcl
ProtectSystem=full
ProtectHome=true
PrivateTmp=true
PrivateDevices=true

[Install]
WantedBy=multi-user.target
完成后保存文件,然后使用以下命令重新启动Varnish服务:
sudo systemctl daemon-reload
sudo systemctl reload varnish.service
如果一切正常,那么您应该能够通过在Web浏览器上输入以下URL来登录到Magento后端:
http://192.168.15.189/admin_wczta4
您还可以通过运行以下命令来检查是否启用了Varnish:
curl -I http://192.168.15.189/admin_wczta4
您应该看到Varnish已启用:
Date: Fri, 07 Jul 2017 17:10:01 GMT
Server: Apache/2.4.18 (Ubuntu)
Set-Cookie: store=default; expires=Sat, 07-Jul-2018 17:10:03 GMT; Max-Age=31536000; path=/; HttpOnly
Set-Cookie: PHPSESSID=irp2k8cmrhct0dfh18qk7ap0i4; expires=Fri, 07-Jul-2017 18:10:04 GMT; Max-Age=3600; path=/; domain=192.168.15.189; HttpOnly
Expires: Thu, 07 Jul 2016 17:10:04 GMT
Cache-Control: max-age=0, must-revalidate, no-cache, no-store
Pragma: no-cache
Location: http://192.168.15.189/admin_wczta4/?SID=irp2k8cmrhct0dfh18qk7ap0i4
X-Content-Type-Options: nosniff
X-XSS-Protection: 1; mode=block
X-Frame-Options: SAMEORIGIN
Content-Length: 0
Content-Type: text/html; charset=UTF-8
X-Varnish: 2
Age: 0
Via: 1.1 varnish-v4
Connection: keep-alive
恭喜! 您已经在Ubuntu 16.04服务器上成功配置了Magento与Varnish。
标签云
-
UbuntuKubernetesMongodbFirewalld监控容器集群WindowsIOSInnoDBDockerSystemdWPSApacheKVMBashSaltStackSSHWiresharkSupervisorDNSTensorFlowiPhoneOpenrestyLUASQLAlchemyWordPress缓存LinuxVagrantsquidWgetZabbixFlaskHAproxyCactiTomcatSambaLVMVPSOfficeMemcacheVsftpdPHPPostgreSQL代理服务器SocketVirtualmin备份部署YumSnmpVirtualboxSecureCRTNFSShellTcpdumpAppleSwiftFlutterLighttpdKloxoPostfixRedhatSwarmCentosGoogleSVNAndroidGITMariaDBCrontabDebianPythonMacOSNginxIptablesDeepinKotlinOpenVZMySQLRedisOpenStackCDNCurlPuttyRsyncGolangJenkinsAnsible