Ubuntu 16.04下部署Graylog日志服务器
raylog 是一个开源的日志管理系统,集中式收集、索引、分析其它服务器发来的日志。它是由 Java 语言编写的,能够接收 TCP、UDP、AMQP 协议发送的日志信息,并且使用 Mongodb 做为后台数据库。它还有一个使用 Ruby 编写的 Web 管理接口,可以轻松管理 Graylog 和查询日志。
Graylog 可以收集监控多种不同应用的日志。本文只是会为了示范说明,会把用到的组件全部安装到一个单独的服务器上。对于大型、生产系统你可以把组件分开安装在不同的服务器上,这样可以提高效率。
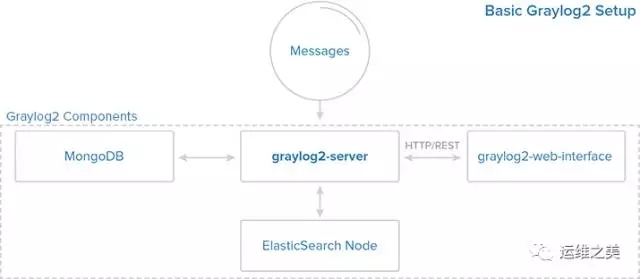
Graylog 2 的组件
Graylog 2 有 4 个基本组件:
- Graylog Server:这个服务负责接收和处理日志/消息,并且和其他组件沟通。
-
Elasticsearch:存储所有的日志,它的性能依赖内存和硬盘IO。
-
MongoDB:存储数据。
-
Web接口:用户接口。
下面是 Graylog 2 各组件之间的关系图
安装和配置 Graylog 2
环境依赖
Graylog 2 需要以下环境依赖:
- 一台 Ubuntu 16.04 服务器,至少有 2 GB 的 RAM。
-
Elasticsearch (>= 2.x,推荐使用最新稳定版本。)
-
MongoDB (>= 2.4,推荐使用最新稳定版本。)
-
Oracle Java SE 或 OpenJDK (>= 8,推荐使用最新稳定版本。)
如果你的 Ubuntu Server 是最小化安装的,还需要提前安装以下软件包:
$ sudo apt-get install apt-transport-https uuid-runtime pwgen
安装 Java JDK
Elasticsearch 是基于 Java 的应用,我们首先需要安装 OpenJDK 或 Oracle JDK。这里我们选择安装 OpenJDK 8:
$ sudo apt-get update && sudo apt-get install openjdk-8-jdk
如果你的系统上存在多个 Java 版本,可使用以下指令设置默认使用版本。
$ update-alternatives --config java
安装 Elasticsearch
Elasticsearch 是 Graylog 一个主要的组件,负责分析和索引日志。Graylog 2.3.x 开始支持 Elasticsearch 5.x, 这里我们就安装 Elasticsearch 5.x 版本。
# 添加 GPG 签名密钥
$ wget -qO - https://artifacts.elastic.co/GPG-KEY-elasticsearch | sudo apt-key add -
# 添加 Eleasticsearch 源
$ echo "deb https://artifacts.elastic.co/packages/5.x/apt stable main" | sudo tee -a /etc/apt/sources.list.d/elastic-5.x.list
# 安装 Elasticsearch
$ sudo apt-get update && sudo apt-get install elasticsearch
编辑 Elasticsearch 配置文件:
$ sudo vim /etc/elasticsearch/elasticsearch.yml
# 把 cluster.name 设置为 graylog。
cluster.name: graylog
修改配置后,你需要重启 Elasticsearch:
$ sudo systemctl daemon-reload

$ sudo systemctl restart elasticsearch.service
如果要把 Elasticsearch 服务加入随系统启动,可以执行以下命令:
$ sudo systemctl enable elasticsearch.service
测试 Elastisearch 工作是否正常
Elastisearch 默认使用 9200 端口接收 http 请求,这里使用 curl 指令进行一个简单的请求测试。
$ curl -X GET http://localhost:9200
{
"name" : "V8jWSvJ",
"cluster_name" : "graylog",
"cluster_uuid" : "8cnTgvEzRZ2U81LTYq5nEw",
"version" : {
"number" : "5.6.3",
"build_hash" : "1a2f265",
"build_date" : "2017-10-06T20:33:39.012Z",
"build_snapshot" : false,
"lucene_version" : "6.6.1"
},
"tagline" : "You Know, for Search"
}
查看 Elasticsearch 的健康状态
$ curl -XGET 'http://localhost:9200/_cluster/health?pretty=true'
{
"cluster_name" : "graylog",
"status" : "green",
"timed_out" : false,
"number_of_nodes" : 1,
"number_of_data_nodes" : 1,
"active_primary_shards" : 0,
"active_shards" : 0,
"relocating_shards" : 0,
"initializing_shards" : 0,
"unassigned_shards" : 0,
"delayed_unassigned_shards" : 0,
"number_of_pending_tasks" : 0,
"number_of_in_flight_fetch" : 0,
"task_max_waiting_in_queue_millis" : 0,
"active_shards_percent_as_number" : 100.0
}
安装 MongoDB
Ubuntu 16.04 默认安装源中包含的 MongoDB (目前版本是 2.6.10) 是支持 Graylog 2.3.x 或更高版本的。
$ sudo apt-get install mongodb-server
启动 MongoDB 服务
$ sudo systemctl start mongodb
如果要把 MongoDB 服务加入随系统启动,可以执行以下命令:
$ sudo systemctl enable mongodb
安装 Graylog Server
Graylog Server 负责接收和处理日志。
# 下载安装 Graylog Server 仓库
$ wget https://packages.graylog2.org/repo/packages/graylog-2.3-repository_latest.deb
$ sudo dpkg -i graylog-2.3-repository_latest.deb

# 安装 Graylog Server
$ sudo apt-get update && sudo apt-get install graylog-server
编辑 Graylog Server 配置文件:
设置 password_secret,首先使用 pwgen 命令生成密码:
$ pwgen -N 1 -s 96
1jfPjMRn5XRsCdVWArjy1nulgXbUJJ8khuW0xQGrqUvJ1iXefhqSh12xsp1dZgkKVsOwiOuDLArh6TYafQE8QFDjEzUIU1tS
修改 password_secret 参数值:
$ sudo vim /etc/graylog/server/server.conf
password_secret = 1jfPjMRn5XRsCdVWArjy1nulgXbUJJ8khuW0xQGrqUvJ1iXefhqSh12xsp1dZgkKVsOwiOuDLArh6TYafQE8QFDjEzUIU1tS
设置 Graylog Server 管理员密码 root_password_sha2,这个密码用来登录 Web 管理页面。
假如你要把密码设置为 000000 ,可以使用 sha256sum 命令来生成:
$ echo -n 000000 | sha256sum
91b4d142823f7d20c5f08df69122de43f35f057a988d9619f6d3138485c9a203
修改 root_password_sha2 参数值:
$ sudo vim /etc/graylog/server/server.conf
root_password_sha2 = 91b4d142823f7d20c5f08df69122de43f35f057a988d9619f6d3138485c9a203
注:password_secret 和 root_password_sha2 参数是必须设定的,否则 Graylog Server 将无法启动。
如果你要设置管理员邮箱和时区,可以使用以下参数值:
$ sudo vim /etc/graylog/server/server.conf
root_email = "admin@hi-linux.com"
root_timezone = UTC
设置 Elasticsearch 节点:
$ sudo vim /etc/graylog/server/server.conf
# Default: http://127.0.0.1:9200
elasticsearch_hosts = http://192.168.100.212:9200
如果需要配置多个 Elasticsearch 节点或是需要认证的节点,可按以下格式配置:
elasticsearch_hosts = http://node1:9200,http://user:password@node2:19200
注:如不配置,默认是连接到本机的 Elasticsearch 节点。
其它一些和 Elasticsearch 的相关设置:
elasticsearch_index_prefix = graylog
elasticsearch_connect_timeout = 10s
elasticsearch_max_docs_per_index = 20000000
elasticsearch_max_total_connections = 20
elasticsearch_max_number_of_indices = 20
elasticsearch_shards = 1
elasticsearch_replicas = 0
安装 Graylog Web 接口
从 Graylog 2.x 版本开始,Graylog 已经默认集成了 Web 接口。
配置 Graylog Web 接口
$ sudo vim /etc/graylog/server/server.conf
# 配置rest Api 的 URI
rest_listen_uri = http://your_ip_or_domain:9001/
# 配置 Web 界面的 URI
web_listen_uri = http://your_ip_or_domain:9000/
注: your_ip_or_domain 为你实际服务器 IP 或域名。
启动 Graylog Server 服务:
$ sudo systemctl daemon-reload

$ sudo systemctl start graylog-server.service
如果要把 Graylog Server 服务加入随系统启动,可以执行以下命令:
$ sudo systemctl enable graylog-server.service
访问 Graylog Web
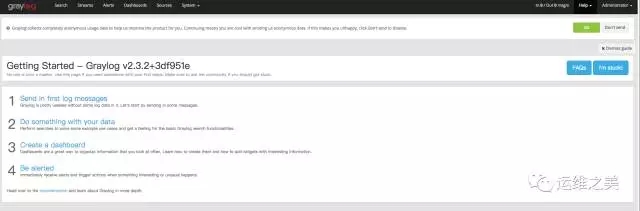
使用浏览器访问 http://your_ip_or_doamin:9000,能成功看到如下界面则表示安装成功。默认用户名为:admin,密码为:root_password_sha2 参数中设置的。
添加一个需收集日志的服务器
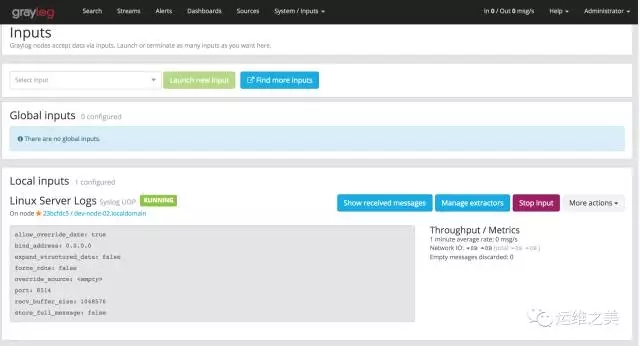
创建 Syslog UDP 输入
Ubuntu 系统自带 Rsyslog 服务无需安装,只需要配置一下即可。
打开 Graylog Web 页面,选择 System->Inputs->Syslog UDP->Launch new input,添加一个要接收 Syslog 日志的服务器。
在弹出的窗口上输入如下信息:
- Node: 在列表中选择你的 Graylog Server 服务器
-
Title: Linux Server Logs
-
Port: 8514
-
Bind address: 0.0.0.0
-
点击 Save
配置完成后就生成了一个监听在 8514 端口上的 Syslog 服务端,下面可以用它来收集其它服务器上的日志。
本次测试采用同一台服务器做演示,所以绑定到所有网卡接口。如只在特定网络中访问,请按实际情况填写 Bind address 的 IP 地址。
现在,我们的 Graylog Server 服务器已经做好了接收其它服务器发来日志的准备。下面我们还需要配置需收集日志服务器,让这些服务器给 Graylog Server 服务器发送日志。
配置服务器发送日志到 Graylog
创建 rsyslog 配置文件 /etc/rsyslog.d/90-graylog.conf。
如果你的 rsyslog 版本 > 5.10,请按以下格式配置:
*.* @graylog_server_ip:8514;RSYSLOG_SyslogProtocol23Format
如果你的 rsyslog 版本 < 5.10,请按以下格式配置:
$template GRAYLOGRFC5424,"<%PRI%>%PROTOCOL-VERSION% %TIMESTAMP:::date-rfc3339% %HOSTNAME% %APP-NAME% %PROCID% %MSGID% %STRUCTURED-DATA% %msg%\n"
*.* @graylog_server_ip:8514;GRAYLOGRFC5424
注:把 graylog_server_ip 替换为 Graylog 服务器 IP 地址。
我这里使用的是 rsyslog 8.16 版本,修改后类似下面:
$ sudo vim /etc/rsyslog.d/90-graylog.conf

*.* @192.168.100.212:8514;RSYSLOG_SyslogProtocol23Format
重启 rsyslog 服务使生效
$ sudo systemctl restart rsyslog
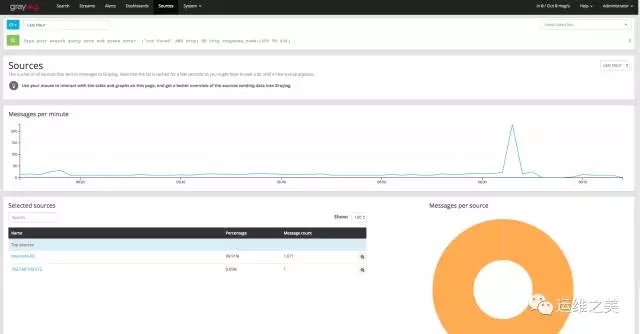
配置完成之后,回到 Graylog Web,点击 Sources,查看是否有新添加 Rsyslog 来源的图形。
搜素 Graylog
在 Graylog Web 上,点击 Search 可以访问 Graylog 搜索页面。 在这里可以根据条件查询指定的日志。

假如你要搜索 ssh 的活动日志,输入关键字 sshd,点搜索图标:
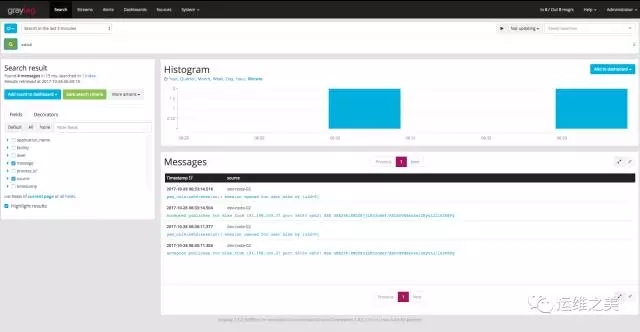
一些常用的搜索语法
- 搜索包含关键字 ssh 的信息
ssh
- 搜索包含关键字 ssh 或 login 的信息
ssh login
- 搜索包含完整关键字 ssh login 的信息
"ssh login"
- 搜索字段类型包含 ssh 的信息
type:ssh
- 搜索字段类型包含 ssh 或 login 的信息
type:(ssh login)
- 搜索字段类型包含完整关键字 ssh login 的信息
type:"ssh login"
更详细搜索语法可参考官方文档:
http://docs.graylog.org/en/2.3/pages/queries.html
到此为止,就完成了一个基本的可以从其它服务器收集日志的 Graylog 服务器部署。当然 Graylog 还提供了其它一系列的丰富功能,比如仪表板、警报和流等功能,期待我们下次进一步的探索吧。
标签云
-
VsftpdiPhoneSwiftMemcacheMySQLShellLVMGITKVMIOSYumWordPressOfficeCactiBash集群MariaDBVPSKloxoSocket部署FlaskGoogleInnoDBWindowssquidOpenStackKotlinSSH容器VirtualminSwarmMacOSRedhatLUAVirtualboxAndroidKubernetesSambaVagrantWgetSupervisorSecureCRTLighttpdDockerZabbixNFSCrontabFlutter备份FirewalldApache监控PythonUbuntuDNSPostfixDebianPHPAnsibleTomcatJenkinsSVNOpenrestyGolangTensorFlow代理服务器HAproxy缓存PostgreSQLPuttyCurlLinuxRedisCDNWPSSaltStackRsyncSQLAlchemyIptablesNginxAppleSnmpCentosDeepinSystemdWiresharkMongodbOpenVZTcpdump